Hickory Golf is the game and hobby that just keeps on giving. From searching for and finding singletons to re-gripping to re-shafting to re-pinning to adjusting loft and lie to whipping to refinishing heads, hickory golf offers the player cum do-it-yourselfer many avenues for learning, investing, and enjoying the game. Lately, I’ve discovered a new avenue, making leather head covers for hickory woods.
As adornment for your highly prized customized play set, personally designed and created head covers add individuality to your bag while giving up hours of joyful pleasure in their making. I offer below my methods for making leather hickory wood head covers, noting that virtually every step can and should be adjusted to suit your own enjoyment. If you like to learn, to play hickories, and to tinker with all things hickory, read on.
Overview
The first step in making hickory head covers is learning to sew. Don’t despair, I learned at 69. Beginning sewing is relatively easy and with time it can become a deeply satisfying hickory add-on hobby. Finding your leather materials is in some ways like finding a new club. Designing your head covers is limited only by your creativity. Cutting the pieces to your design requires a little care for fingers and sewing margins. Assembling your head cover teaches one some key techniques in ironing and choosing your sewing stitches. Finally, you will want to protect your creation from the elements. I will provide a list of materials needed at the end of the explanation of each step. I refer here to a basic 2-piece (front and back) design. Later we can move onto more complex pieces (if you want).
Learning to Sew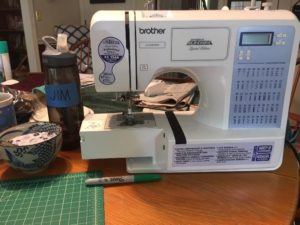
Whether your partner sews or not, men, don’t pooh-pooh this prospect. It’s easy and fun! First you will need a simple sewing machine. They are relatively inexpensive, less than one round of golf at around $100 for a basic (yet quite capable) machine. I bought a Brother (Japanese) Project Runway model. There are machines out there for over a thousand dollars, but like golf clubs, the latest Honma model or the rare Nicoll single won’t necessarily help you play (or sew) better. Find a reasonable, simple machine and get ready to enjoy!
The first thing is to make a full bobbin of your initial thread color. The bobbin carries the bottom thread and fits in the base of the machine. Each machine has instructions with it—and there are videos on Youtube. You load your thread spool, wind the thread around 2 or 3 key points or guides, click the bobbin stem in place and press your foot peddle. I find it relaxing to watch the machine automatically spool the thread on the bobbin. Trim the end of the thread and insert into the base of the machine as instructed. The bobbin should rotate counter-clockwise when you pull the thread; take the end and wrap it as instructed on the base of the machine. This cuts the bobbin thread and lines it up for the needle (top) thread to catch.
After filling and inserting your bobbin, you must thread the machine. This seems difficult, but is not. The trick is to hold 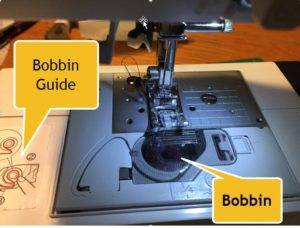 the thread in your right hand while you thread with the left hand so the thread doesn’t keep coming off the spool. The threading goes around a guide on the back and then forward over the machine toward you. Then, you make a reverse N with the thread. Again, lots of help on Youtube and in your machine manual.
Then, there is a little hook-guide right above the needle. You hold the thread horizontal and pull it behind the guide so it goes straight down the needle. NOW, to thread the needle. Many machines have automatic threaders. I learned on Youtube. My wife prefers to thread the needle manually. My eyes and fingers are too bad/big. I’m not going to show you lots of photos here since there is so much on YouTube and the Internet to guide you. Make a bobbin and insert it and then thread your machine.
Many machines will have adjustments for type of stitch (e.g. zig-zag or straight) and length of stitch. I usually use the 4mm long simple straight stitch (00 on my Brother’s readout).
Try a few seams. There’s a button on the front of the machine that reverses the stitching. This process (just one stitch needed) ties a knot on the beginning and end of a seam. Touching the reverse button once or tapping the foot pedal once gives you one stitch (backward and forward). I often go stitch by stitch around curves. I always start a seam by hand by rotating the knob on the right hand side of the machine one time toward me. Notice the guide lines on the base of the machine. Watch the guidelines to sew, not the needle. If you keep the edge of your material on the guideline (from 1/16 to 1”) you will be sewing a straight seam.
I didn’t practice a lot. By your second or third head cover, you will be doing much better. Enjoy the learning process. I was impatient, so I got right away to my first cover.
Design
This is the fun part. I had bought a sewing machine and leather hides a full two years before I decided to go ahead. Mostly other things kept distracting me. Plus, I was hesitant about how to design the covers. Don’t blanch. You will do many. Just begin! One of the most enjoyable aspects of this process is the designing. There are tons of options. Golf Digest, March 2017, page 40, has a whole page of design options. And there are a million possible alternatives. Stripes, numbers, patches, stars, whatever you want.
I went through my old ball caps and cut the logos off of some of them to use on my head covers. US OPEN, for example or my school’s logo. I even re-cycled an old, worn-out head cover from St. Andrews Open 2005 by cutting out the logo and adding it to a more sturdy leather home-made cover. Flimsy hat from your USGA membership? Cut out the logo and make a head cover!
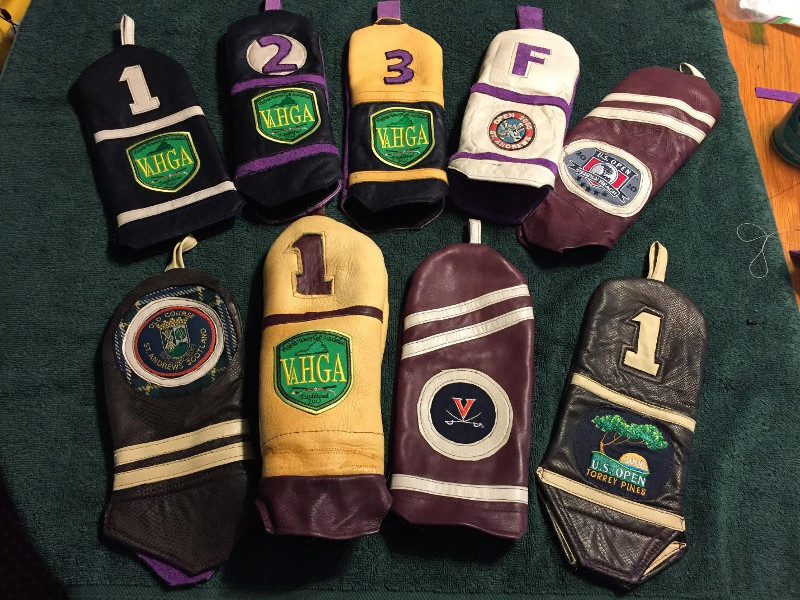
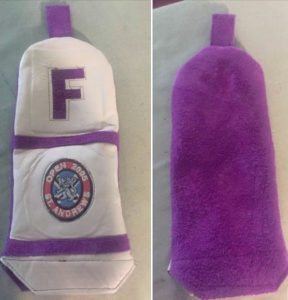 There so many questions to settle: What colors do you want to use? The back can be rough side in or out. How will you indicate the club inside? By numbers? Number of stripes? I made an “F” head cover to indicate a fairway wood inside. “C” for your favorite cleek? “B” for your Bulldog?
What will you do with the top? Round? (harder to sew evenly but more traditional) Square? Triangular? (unusual!) Loop on top? No loop?
What will you do with the bottom? This is a big one. You can make a simple hem on the bottom. I have bought head covers with just that. You can fold the cover leather over to make a “finished” seam. (A finished seam or hem has the edge folded over and sewn and then if showing, folded again and sewn so no rough edges show.) Half-circle scallops? I settled pretty quickly on a trapezoidal skirt design: 45* angle from the edge to about 1.5” from the edge with a finished seam on the bottom and a simple cut seam on the angles. Cutting and sewing angled finished skirt hems is difficult.
You can also use two kinds of material for top and bottom. This helps use up any too small patches of leather that you don’t want to throw away.
The KEY DIMENSIONS are these. For a hickory era driver, 5 ½” wide and 12” long. This is the basic rectangle for both cover and lining. This allows for a half inch seam on either side. For a spoon or fairway wood, I use 5” x 12” as my basic pattern. Most of the head covers I’ve seen are 10” high; 12” allows for a nice finished 1” trapezoidal skirt on the bottom. Of course, you can tinker with your own dimensions as you wish.
Buying Material
Where do you buy leather suitable for head covers? There are many places on-line. My favorite is Distant Drums, (www.distantdrumsonline.com) introduced to me by Rob Alschwede. They show each hide separately and give you its dimensions and weight or thickness. They sell many different species of hides: deer, elk, cow, antelope, buffalo, and moose for example. They also sell different kinds of tanning process. Stay away from vegetable tanned hides, they are more like cardboard.
Leather thickness is measured in “ounces.” 1-2 ounce leather is too thin for head covers. 5 is too thick to sew. (Unless you have an industrial machine and heavy needles.) 3-4 is about right. I have sewn 4-5 ounce leather, but one must stitch using the manual knob one by one lest you break a needle.
They have all kinds of colors. I recommend black and ivory to begin with. But suit yourself. Your alma mater’s colors?
NOTE: Distant Drums inventory varies from time to time depending on the hunting seasons etc. If you don’t find what you want at first, try later or search other sites.
You can find fleece on-line for your lining or you can use an old flannel or plaid shirt or any old shirt for that matter.
Cutting
Once you have designed your cover, you are ready to cut the pieces. I offer no “pattern” for this other than the basic 5.5”  x 12” design mentioned above. You can draw your image on paper. Or you can cut a basic template and lay out some pieces on your cover the way you want them.
I have now gotten to laying out my cutting mat (which has inch lines on it—very helpful), and cutting 5.5” x 12” rectangles of cover, back, and two linings (fleece for me although you can use old ). Four pieces. Using the roller cutter. Sharp edges, nice and neat. This is my basic starting point.
DANGER: When you use the roller cutter never cut across your arm or fingers. Always have your fingers away from the cutting edge of the ruler. BE CAREFUL. The roller is a razor edge.
With my four pieces in front of me, I have made a couple of design decisions: color of the cover, color of the back and rough or smooth side out, and which liner to use.
From here, you can lay loosely on the cover a patch, a numeral, and some stripes. Move them around until you like what you see. I find that one needs 2” from the top to the top of the top half patch or numeral. If you use stripes to indicate the club (e.g. 1 or 2 or 3) position them at about 30* angles. 45* is too steep. I’ve been cutting my stripes 3/8” to ½” in width. A good patch size (e.g. VaGHA logo patch) is 2.5” by 2”. My latest supplier of the SOHG patches says they have to be 3.5” x 3” or the “Society of Hickory Golfers” is not legible. A little big but doable. I ordered 300 of these, so I’m sure I’ll have LOTS of extras if you want some.
There are lots of ways to do numbers. You can cut one out and stitch it on top of the cover piece. I think it looks better to use the X-acto knife and cut the number out of the cover and then stitch a patch of another color under it. I’ve also put a numeral on top of a circle on top of the cover piece. Lots of options.
I get my numerals off the computer. 1.5” high. SO many different type faces, you can find the ones you like. I print them out on paper and then cut them out to use as templates.
If you cut the number in the cover piece, work from the back side to keep the cover clean. Be careful with the Xacto knife so you don’t over cut – which will be visible later on. Work from the corners inward. Be sure to trim any tiny leavings on the cut before you assemble.
I keep the pieces I cut out (e.g. numbers) and use them on the next design—stitching them on top.
The Magic of Wunder Under
Now that you have your design settled and cut out the various pieces, you are ready to begin assembling your front and back sections.
When one tries to sew two pieces of leather, the leather stretches and moves as you sew so you end up with bumps, ripples, and wrinkles. The solution to this problem is WUNDER UNDER! Wunder Under is basically heat activated double faced tape for sewers. It comes in a bolt. Very cheap on-line or at your local fabric store. The general process is
- Cut to the shape of what you are sewing
- Place the crystallized side (rough) on the piece.
- Place a press cloth over the pieces.
- Iron on steam setting for 10 seconds.
- Let cool.
- Pick off the paper backing with a pocket knife.
- Put the other piece on top.
- Cover with press cloth.
- Iron for ten seconds and
- VOILA! You have two pieces of leather “glued” together and stabilized so you can sew them together.
So, now, cut two pieces of Wunder Under the same size as your front and back pieces, 5 ½ x 12”. Cut a piece for each item you are placing on your cover, numbers, patches, stripes. If your patch has glue on the back, you don’t need Wunder Under.
If you are cutting a number hole in your cover, you will need to cut a piece of Wunder Under in the shape of the number’s patch and then cut out the number in the middle of the Wunder Under. That way, when you iron it to the back side of your cover, there won’t be any Wunder Under “film” or “glue” showing on the face of the number. With me?
Make a “press cloth” out of a piece of ordinary fabric. Maybe 15” by 15”. Lay this on the ironing board and place your lining pieces on the press cloth. Place the CRYSTALISED rough side of the Wunder Under on the lining. Fold the press cloth over the top of the two pieces. Press the hot, steam set, iron on all parts of the lining pieces for ten seconds at a time.
Let cool for a minute or two. Using your pocket knife, lift the edge of the paper of the Wunder Under and peel the rest off. A dry film will be visible on the lining. Lay the BACK piece on one of the linings, cover with the top half of your press cloth and bind the two with the iron—again ten seconds on all sections. DO NOT do the cover piece yet.
Now the back piece is bonded to the lining so that when you stitch on it, it won’t migrate on you.
Put all of the cover pieces (stripes, etc.) outside down on the cover cloth. Put the CRYSTALIZED side of the Wunder Under pieces cut to shape on their shapes. Fold the press cloth over, and press all sections at steam level for 10 seconds.
Using your pocket knife, lift and peel off the paper WunderUnder from all of the cover pieces. Place your cover sheet on the press cloth and then arrange your newly WunderUndered pieces on top of the cover piece, and press (using the press cloth to protect the leather).
At this point, all your pieces are bonded so they won’t migrate when you sew.
Sewing
Sew your “bottom” on both the front and back pieces. I fold the skirt 1” up “inside” by folding to the lining both back and front covers and then stitch a seam across both (separately). I usually start in the middle of the seam because even with WunderUnder, the pieces tend to stretch a little and move. Starting in the middle of the seam and working outwards minimizes this.
Don’t pull on the material, let the sewing machine foot do the work. Keep your eye on the guide lines. With a little practice you can make very nice, tight, straight seams.
Now draw a line from the just finished seam end to a point 1 ½” from the edge on the bottom of the piece. This is about a 40* angle. (1” high, 1.5” wide) Repeat on the other side.
Then I start a seam in the middle of the bottom hem (now a finished hem because of the fold), and stitch to the corner, lift your sewing foot, rotate, reset the foot and stich along the line you just drew to the edge where the cross seam exits the piece. Reinforce with a few reverse stitches.
Repeat on the other side and on the other piece (back piece).
Then, using your long scissors or your roller cutter, cut the corners off the skirt just outside the seam.
On the back piece, I put two strips of Velcro material. I think this is important because even with proper dimensions and enough length on your head cover they can slip off. I create a large V with two inch Velcro so I can pinch the back after inserting the golf club to keep it secure. I tried vertical pieces and horizontal pieces. Suit yourself. I like the V because it is secure but comes undone easily by just pulling on the top of the cover (which is why I put a Loop on the top of mine).
Stitch the Velco V on the lining side of the back piece just above the cross seam. If you are using same color thread as back piece, you can hardly see the V on the outside of the back. See the purple Fairway wood above. Can you see the large V on the back piece?
Stitch around all of the pieces you put on the cover. Do this before you bond the lining; it makes it easier to sew this detail work. You can use same color thread if you don’t want to see the thread. Go slowly. This is your finish work. One stitch at a time if necessary.
After you have sewed on all your cover pieces (including around the under number if you used that style), you can iron bond the lining. Put the cover piece face down on your press cloth, fold the press cloth over the top and iron.
Place your front and back pieces outside together with lining sides out flat on the table. Trim any edges if lining or leather has crept here and there. Try to maintain your original dimensions of 5.5” or 4.5” width.
If you plan to insert a loop in the top, now is the time to do it. Cut a 1” wide 3” long strip of your loop leather and fold it in half length-wise. Insert the loop in between the two pieces so the cut ends are exposed. Push them into the cover til they are even with the edge of the two pieces. I start my seam on the loop for several reasons. It needs to be reinforced. The sides will wander a little while you sew, so if you begin at the bottom skirts, by the time you get all the way around, they may not match up. YOU MUST GO SLOWLY as you begin because of the thickness of the six pieces of material—four leather and two lining. I will go one stitch at a time and help the needle down through the material with the manual knob. I broke a needle on this part. Be careful. After two stitches off the loop material do one or two reverse knot stitches. Then proceed downward around the curve and down the sides being careful to maintain a nice ½” seam width. Go slowly over the stripes (if any) as they add thickness. When you get to the end, go slowly over the edges and reinforce 2-3 times with reverse stitches.
Repeat on the other side.
Trim any excess seam leaveage if necessary. If you kept a tight ½” seam, you should be okay without any excess trimming. You can cut V’s in the curved section if you want to make the turning inside out easier.
Now, carefully (not putting stress on your new seam), turn the cover inside out. Work along the seams not the middle. Gently push the whole through, and soon you will see the end of the loop. Pull the loop to complete the turning. Roll the outside seam with your finger tips to get it all the way turned.
And VIOLA, you have made your first leather head cover! Make a dozen more! Enjoy! Send me a photo at jimclawson@virginia.edu or post it on your Facebook page!
Weather Proofing
I spray all my head covers with ScotchGard. This seals the leather from water and rain. You may have a better method?? Let it dry outside; She Who Must Be Obeyed sometimes doesn’t like the smell of the ScotchGard.
Things You’ll Need
The lists of equipment and materials you will need may seem long, but if you like tinkering with hickory clubs you already have a shop full of tools and doo-dads that you use on your clubs. The equipment for making head covers is quite inexpensive and all of it is available from Amazon on-line.
Equipment:
- Sewing Machine (e.g. Brother Project Runway)
- Thread, colors of your choice
- #14 or #16 needles or you can get some heavy duty leather needles if you wish. I didn’t.
- 12” x 18” self-repairing cutting mat.
- Roller cutter. Fiskars makes good ones. There are 45mm and 60mm. I use both but prefer the larger 60 mm one. Replacement blades are also cheap. My first blade has lasted for more than 12 covers.
- Iron
- Ironing board
- X-Acto Knife
- 12” aluminum ruler or one with a metal edge. The roller cutter will cut into wood or plastic straight edges.
- Tweezers (for picking out loose threads)
- Seam rippers (cheap). They help you with “mulligans” or do-overs.
- Compass (from elementary school) or a 5.5” saucer for scribing circles
- Short thread nipping scissors
- Longer regular scissors (must be sharp and sharpened)
- Pocket Knife
Materials:
- Leather patches. I got most of mine from Distant Drums on-line. They show the whole hide, type (elk, cow, lamb, deer, etc.) You can pick your colors. With regard to thickness, 1-2 is too thin. 3 is just right. 4 is getting too thick but can be used to make grip strips. Tandy also sells leather but much more expensive and mostly for tooling belts and purses, so it’s too thick.
- Thread. Pick your favorite colors. Don’t need special thread, just something probably polyester and reasonably strong.
- Lining. I bought a yard of fleece on-line. You can use old shirts, flannel, thin blankets, anything to give the head cover a little heft and that will be soft on your clubs. I have a nice head cover from the Bridges (Phil’s club) that has a plaid lining. Lots of options here.
- Wunder Under. This stuff is the magic to the whole process. Bascially it is heat activated double faced non-sticky tape. It won’t stick on your needle. You cut it to shape, then iron the crystally side onto one surface. Let it cool, pick off the paper backing with your pocket knife and then apply the second surface and iron once more, ten seconds for each section. It is magic.
- ScotchGard weather proofing spray.